Table of contents
Today i want to talk about my one of the most favourite features in android development that is “Drag and Drop”.
In modern user interfaces, drag and drop has become an essential interaction pattern for enabling users to move objects around a screen with a touch gesture.
The drag and drop framework in Android Kotlin provides a simple and flexible way to implement drag and drop functionality in your app. It allows users to drag a view or item from one location to another by simply tapping and holding the item, and then dragging it to its desired destination. The drag and drop framework is based on three key components: the DragEvent, the DragShadow, and the ClipData object.
DragEvent:
The DragEvent class is responsible for managing the entire drag and drop lifecycle. It provides a set of constants that represent different states of the drag and drop operation. These states include ACTION_DRAG_STARTED, ACTION_DRAG_ENTERED, ACTION_DRAG_LOCATION, ACTION_DRAG_EXITED, ACTION_DROP, and ACTION_DRAG_ENDED. These states are used to identify when a drag operation is starting, when it's in progress, and when it's completed.
DragShadow:
The DragShadow class is responsible for creating a visual representation of the item being dragged. It is an optional component that can be used to provide a custom visual representation of the item being dragged. It's also possible to use the default drag shadow, which is a simple opaque image of the view being dragged.
ClipData:
The ClipData class is responsible for storing the data associated with the item being dragged. This data can be anything that you want to associate with the item, such as text, images, or other types of data. You can use the ClipData.newPlainText() method to create a new ClipData object that contains plain text data, or you can create a custom ClipData object that contains any type of data.
These were the fundamental parts. Now let’s think about a Drag and Drop game you want to built for kids. To built this you must know about View.setOnTouchListener()and View.OnDragEventListener().
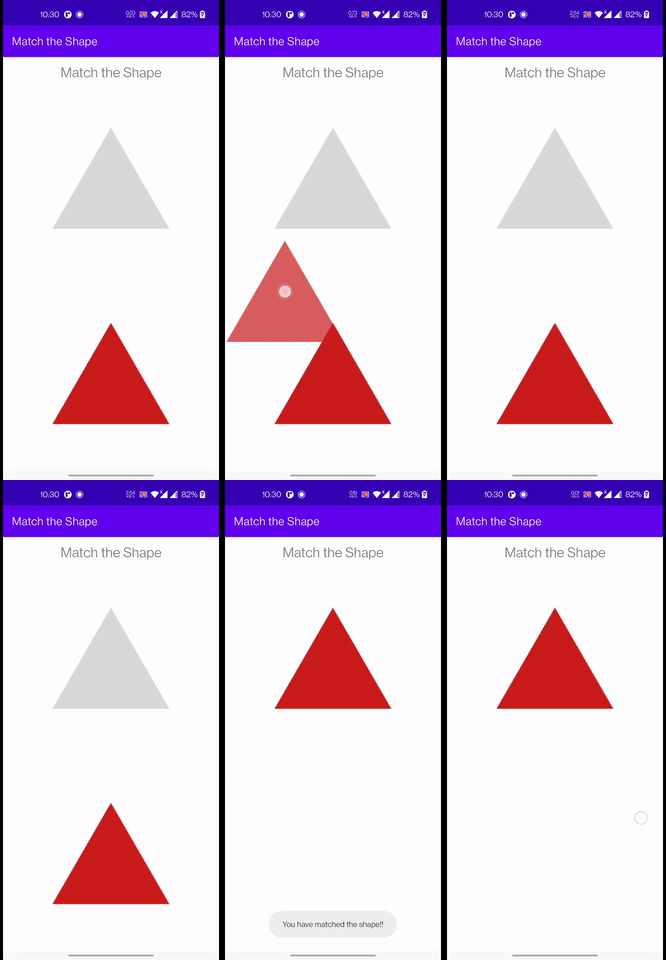
Note that i am just sharing the basic concept. Assume i want to match a shape. Let’s call it “Match the Shape”. I this application I have a triangle shaped object and want to match it with the shape. Now proceed of making this little application.
Click on File, then New => New Project.
After that include the Kotlin support and click on next.
Select the minimum SDK as per convenience and click the next button.
Then select the Empty activity => next => finish.
View Binding
I have used view binding in this project. To enable view binding in a module, set the viewBinding build option to true in the module-level build.gradle file, as shown in the following example:
buildFeatures {
    viewBinding = true
}
activity_main.xml file
In the xml file we have two ImageView one is for showing the shape ivTriangle and another one ivTriangleDragto drag it on the shape.
<?xml version="1.0" encoding="utf-8"?>
<LinearLayout xmlns:android="http://schemas.android.com/apk/res/android"
    xmlns:tools="http://schemas.android.com/tools"
    android:layout_width="match_parent"
    android:layout_height="match_parent"
    android:orientation="vertical"
    tools:context=".MainActivity">

    <TextView
        android:id="@+id/tvTitle"
        android:layout_width="match_parent"
        android:layout_height="wrap_content"
        android:layout_marginTop="12dp"
        android:text="Match the Shape"
        android:textAlignment="center"
        android:textSize="24sp" />

    <ImageView
        android:id="@+id/ivTriangle"
        android:layout_width="wrap_content"
        android:layout_height="match_parent"
        android:layout_margin="12dp"
        android:layout_gravity="center"
        android:layout_weight="1"
        android:src="@drawable/ic_triangle" />

    <ImageView
        android:id="@+id/ivTriangleDrag"
        android:layout_width="wrap_content"
        android:layout_height="match_parent"
        android:layout_margin="12dp"
        android:layout_gravity="center"
        android:layout_weight="1"
        android:src="@drawable/ic_triangle_drag" />


</LinearLayout>
MainActivity.kt
We will implement the onTouch and onDrag functions of View.OnTouchListener and View.OnDragListener correspondingly.
class MainActivity : AppCompatActivity(), View.OnTouchListener, View.OnDragListener{

..........
 override fun onTouch(v: View?, event: MotionEvent?): Boolean {
        ........
  }

 override fun onDrag(v: View?, event: DragEvent?): Boolean {
        .........
  }

}
Here in onCreate function we will initialise the setOnTouchListener to ivTriangleDrag and setOnDragListener to ivTriangle . As we want to touch ivTriangleDrag then drag it over ivTriangle and drop.
override fun onCreate(savedInstanceState: Bundle?) {
    super.onCreate(savedInstanceState)
    mViewBinding = ActivityMainBinding.inflate(layoutInflater)
    setContentView(mViewBinding.root)

    mViewBinding.ivTriangleDrag.setOnTouchListener(this)
    mViewBinding.ivTriangle.setOnDragListener(this)

}
Now we can see the Motion.ACTION_DOWN event of ivTriangleDrag will trigger when we will touch it and drop it in the screen anywhere.
override fun onTouch(v: View?, event: MotionEvent?): Boolean {
    return if (event!!.action == MotionEvent.ACTION_DOWN) {
        val data = ClipData.newPlainText("", "")
        val shadowBuilder = DragShadowBuilder(v)
        v?.startDragAndDrop(data, shadowBuilder, v, 0)
        true
    } else {
        false
    }
}
And the onDrag function will trigger the DragEvent callbacks. Now when we will drop ivTriangleDrag over ivTriangle then ACTION_DROP will trigger and as we wanted we will change the background ivTriangle and will INVISIBLE ivTriangleDrag Imageview.
override fun onDrag(v: View?, event: DragEvent?): Boolean {
    when (event?.action) {
        ACTION_DRAG_STARTED -> {
            Log.d(msg, "Action is DragEvent.ACTION_DRAG_STARTED");
        }
        ACTION_DRAG_ENTERED -> {
            Log.d(msg, "Action is DragEvent.ACTION_DRAG_ENTERED")
        }
        ACTION_DRAG_EXITED -> {
            Log.d(msg, "Action is DragEvent.ACTION_DRAG_EXITED")
        }
        ACTION_DRAG_LOCATION -> {
            Log.d(msg, "Action is DragEvent.ACTION_DRAG_LOCATION")
        }
        ACTION_DRAG_ENDED -> {
            Log.d(msg, "Action is DragEvent.ACTION_DRAG_ENDED")
        }
        ACTION_DROP -> {
            Log.d(msg, "ACTION_DROP event")
            mViewBinding.ivTriangle.setImageResource(R.drawable.ic_triangle_drag)
            mViewBinding.ivTriangleDrag.visibility = INVISIBLE
            Toast.makeText(this@MainActivity,"You have matched the shape!!",Toast.LENGTH_SHORT).show()
        }

    }
    return true
}
Here is a preview of “Match the Shape” App. And it’s Ready.

Match the Shape
Hope this article helps you. To check out Full Code, here is the Repository .
Happy Coding! :)
Thanks for reading my article. If you found it valuable, follow me on Medium and LinkedIn for more updates on Android development. I’ll be sharing new articles and resources to help improve your process and deliver better products. Thanks again for reading, and I look forward to connecting with you!

